Vue.js
1 MVC/MVP/MVVM
MVC:
- Model
- View
- Controller
社会上需要有分工,编程分模板。分的目的是为了提高效率,便于维护。
这是一种非常自然,也是一种使用最普遍的分层方式。
但是 MVC 在实际运用中,往往暴露出一个非常大的问题:
- Model/View 相对简单,但是 Controller 太大了,责任太重了
- Controller 往往会超过几千行代码,里面混杂太多逻辑了
由于存在上述问题,自然就产生了其他的一些解决方案。 这些解决方案基本上都是基于 MVC 模式,可以说,他们都是 MVC 模式的变种。
比如说,MVP (Most Valuable Player)
MVVM:
- Model
- View
- View Model
<!-- View -->
<html>
    <table id="xxx">
    </table>
</html>

<script>
 // Model
 $.ajax('/url', {...}).done(doRender);

 // Controller
 function doRender(data) {
     // 把 Model 里的相关数据,绑定到页面 View 的相关位置
     var node = $("#xxx");
     var html = "<tr>" + "data 拼接成 <td> 连接起来的方式" + "</tr>";
     node.innerHTML = html;
 }
</script>
2 示例
指令模板 (View):
<div id="app">
  <section>
    <h4>进行数据绑定,判断、循环</h4>
    <div v-for="person in persons" v-if="person.age > 18">
      <div>name: {{person.name}}</div>
      <div>age: {{person.age}}</div>
      <div>address: {{person.address}}</div>
    </div>
  </section>

  <section :style="mystyle" v-bind:title="mytitle">
    <h4>进行属性绑定,事件的声明</h4>
    <span>{{message}}</span>
    <button v-on:click="changeStyle">改变颜色</button>
    <button @click="reverseMessage">反向显示</button>
  </section>

  <section>
    <h4>数据的双向绑定</h4>
    <div><input v-model.number="firstScore" placeholder="第 1 个人的分数"></div>
    <div><input v-model.number="secondScore" placeholder="第 2 个人的分数"></div>
    <div><input v-model.number="thirdScore" placeholder="第 3 个人的分数"></div>
    <div>当前,所有人的总分为: {{firstScore + secondScore + thirdScore}} </div>
    <button v-on:click="submit">提交</button>
  </section>

  <section>
    <h4>指令的修饰符</h4>
    <a href="http://www.baidu.com" @click.prevent="hahaha">百度</a>
    <input @keyup.13="heiheihei">
  </section>

  <div>
    {{sysmsg1}}
  </div>
  <div>
    {{sysmsg2}}
  </div>

  <table>
    <tr>
      <th>编号</th>
      <th>名字</th>
      <th>价格</th>
    </tr>
    <tr v-for="book in books">
      <td>{{ book.id }}</td>
      <td>{{ book.name }}</td>
      <td>{{ book.price }}</td>
      <td><a href="" @click.prevent="killMe(book.id)">删除</a></td>
    </tr>
  </table>
  <div v-if="books.length == 0">
    目前没有任何书籍
  </div>

  <div style="border: 1px solid grey; border-radius: 5px; padding: 1em;">
    <div><input v-model="book.id"></div>
    <div><input v-model="book.name"></div>
    <div><input v-model="book.price"></div>
  </div>
  <button @click="saveBook">保存</button>
</div>
View Model:
var vm = new Vue({
    el: '#app',
    data: { // Model
        persons: [],

        message: 'hello, my friend.',
        mystyle: "color: red",
        mytitle: '现在时间: ' + new Date(),

        firstScore: 100,
        secondScore: 10,
        thirdScore: 220,

        sysmsg2: '空',
        books: [],
        book: { id: 0, name: '', price: 100 }
    },
    watch: {
        firstScore: function(n, o) {
            console.log("skdfjsdk");
            this.sysmsg2 = `老的 firstScore 为 ${o} 新的为 ${n}`;
        }
    },
    computed: { // 通过计算得来的属性
        sysmsg1: function () {
            if (Math.random() > 0.5) {
                return this.message + this.thirdScore + new Date();
            } else {
                return "hello";
            }
        }
    },
    methods: {
        changeStyle: function () {
            var colors = ["green", "red", "yellow", "pink", "blue"];
            var randColor = colors[Math.floor((Math.random()*colors.length))];
            this.mystyle = "color: " + randColor;
        },
        reverseMessage: function () {
            this.message = this.message.split('').reverse().join('');
        },
        submit: function () {
            console.log(vm.firstScore);
            console.log(vm.secondScore);
            console.log(vm.thirdScore);
        },
        hahaha: function () {
            alert("哈哈哈哈");
        },
        heiheihei: function () {
            alert("嘿嘿嘿: " + event.keyCode);
        },
        saveBook: function () {
            this.books.push({
                id: this.book.id,
                name: this.book.name,
                price: this.book.price
            });
            this.book = {};
        },
        killMe: function (id) {
            this.books = this.books.filter((b) => b.id != id);
        }
    },
    created: function () {
        this.books.push({
            id: 1,
            name: 'ssss',
            price: 232
        });
    },
    mounted: function () {
        console.log("现在,所有的工作都准备就绪了!!");
    }
});


function xxx () {
    event.preventDefault();
    alert('骗你的');
}
3 示例,用户评论
3.1 最终效果如图
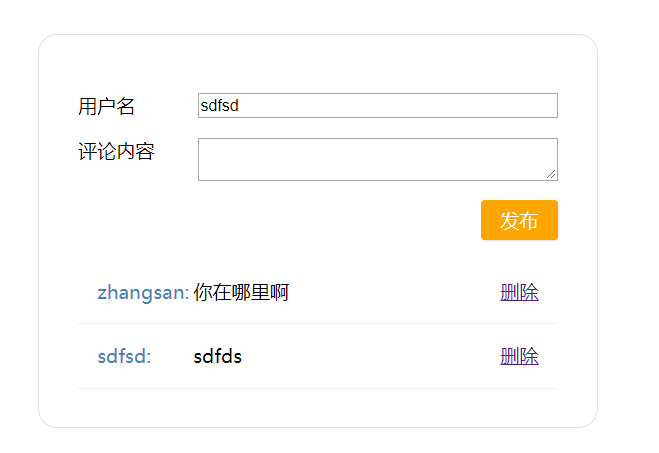
其他要求:
- 使用 Vue 实现
- 使用组件
- 用户输入用户名和评论,点击按钮后,评论发布成功
- 用户名和评论都不能为空
- 将用户名缓存到本地的 localStorage 里面,如果刷新页面,直接使用上次缓存的名字
- 将评论列表的内容也缓存到本地 localStorage 里面。首次加载页面,先到缓存里读取并渲染,如果有修改,那么缓存也要更新
- 实现评论的删除功能
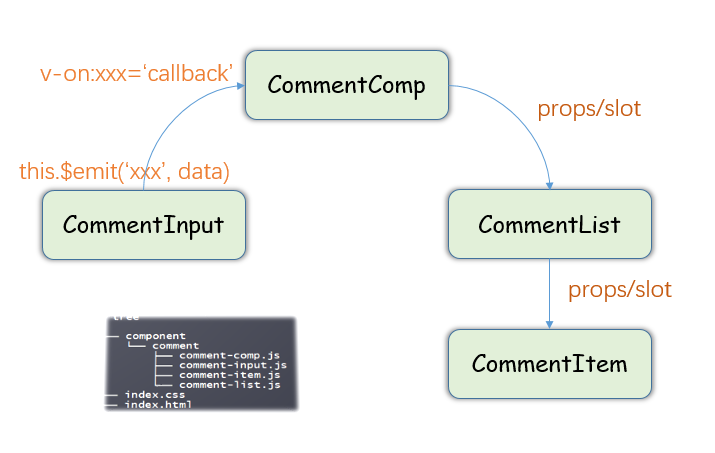
3.2 分析页面,划分组件,确定组件间的数据传输方式
3.3 Index.html/index.css
html:
<!doctype html>
<html lang="en">
    <head>
        <meta charset="UTF-8"/>
        <title>评论模块</title>
        <link rel="stylesheet" href="index.css">
        <script src="https://cdn.bootcss.com/vue/2.5.13/vue.js"></script>
    </head>
    <body>
        <div id="root">
            <comment></comment>
        </div>

        <script type="module">

         import commentComp from './component/comment/comment-comp.js';

         Vue.component('comment', commentComp);

         var vm = new Vue({
             el: '#root'
         });

        </script>
    </body>
</html>
css:
#root {
    width: 400px;
    padding: 2em;
    margin: 2em auto;
    border: 1px solid #e0e0e0;
    border-radius: 1em;
}
.cinput {
    margin-bottom: 1em;
}
label {
    display: flex;
    margin: 1em 0;
}
label span {
    flex-basis: 100px;
}
input, textarea {
    flex: 1;
}
.cinput footer {
    text-align: right;
}
.cinput button {
    border: none;
    background-color: orange;
    padding: .4em 1em;
    color: white;
    font-size: 16px;
    border-radius: 3px;
    box-shadow: 1px 1px 1px #e0e0e0;
}


.comment {
    padding: 1em;
    border-bottom: 1px solid #f0f0f0;
    display: flex;
}
.comment-author {
    color: steelblue;
    flex-basis: 80px;
}
.comment-delete {
    margin-left: auto;
}
3.4 CommentComp
import commentInput from './comment-input.js';
import commentList from './comment-list.js';

export default {
    template: `
        <div>
            <cinput @woyaobaocun="zhendeyaobaocuna"></cinput>
            <clist @shanchuwo="zhendeyaoshanchu" v-bind:comments="comments"></clist>
        </div>
    `,
    data() { return {
        comments: []
    }},
    methods: {
        updateLocal() {
            localStorage.setItem('vvv-comments', JSON.stringify(this.comments));
        },
        zhendeyaobaocuna(res) {
            this.comments.push(res);
            this.updateLocal();
        },
        zhendeyaoshanchu(id) {
            this.comments = this.comments.filter((c) => c.id != id);
            this.updateLocal();
        }
    },
    components: {
        cinput: commentInput,
        clist: commentList
    },
    created() {
        const cs = localStorage.getItem('vvv-comments');
        if (cs) {
            this.comments = JSON.parse(cs);
        }
    }
}
3.5 CommentInput
// 1. 定义
var commentInput = {
    template: `
        <div class='cinput'>
            <label>
               <span>用户名</span>
               <input v-model='author'>
            </label>
            <label>
                <span>评论内容</span>
                <textarea v-model='content'></textarea>
            </label>
            <footer>
                <button @click='doSave'>发布</button>
            </footer>
        </div>
    `,
    data() { return {
        author: '',
        content: ''
    }},
    methods: {
        doSave() {
            if (!this.author) {
                return alert('用户名不能为空');
            }
            if (!this.content) {
                return alert('内容不能为空');
            }

            // 更新保存在 localStorage 里的作者名
            localStorage.setItem('vvv-authorname', this.author);

            // 发射、广播出去
            this.$emit('woyaobaocun', {
                id: +new Date(),
                author: this.author,
                content: this.content
            });

            // clear
            this.content = '';
        }
    },
    created() {
        const authorname = localStorage.getItem('vvv-authorname');
        if (authorname) {
            this.author = authorname;
        }
    }
};

// 2. 导出
// default 代表默认导出,一个模块中只能有一个
export default commentInput;
3.6 CommentList
list:
import commentItem from './comment-item.js';

export default {
    props: ['comments'],
    methods: {
        doDelete(id) {
            this.$emit('shanchuwo', id);
        }
    },
    template: `
       <div class='clist'>
           <comment v-for='c, index in comments'
               :comment='c'
               :key='c.id'
               @shanchuwo='doDelete'>
           </comment>
       </div>
    `,
    components: {
        comment: commentItem
    }
};
item:
export default {
    props: ['comment'],
    methods: {
        deleteMe() {
            this.$emit('shanchuwo', this.comment.id);
        }
    },
    template: `
       <div class='comment'>
           <span class='comment-author'>{{comment.author}}:</span>
           <span class='comment-content'>{{comment.content}}</span>
           <a href @click.prevent='deleteMe' class='comment-delete'>删除</a>
       </div>
    `
};
4 Vue API
4.1 指令
v-textv-htmlv-showv-ifv-elsev-else-ifv-forv-onv-bindv-modelv-prev-cloakv-once
4.2 选项
new Vue({
    // 数据选项
    data,
    props,
    prosData,
    computed,
    watch,
    methods,

    // DOM选项
    el,
    template,
    render,
    rederError,

    // 生命周期
    beforeCreate,
    created,
    beforeMount,
    mouted,
    beforeUpdate,
    updated,
    //..

    // 资源
    directives,
    filters,
    components,

    // 组合关系
    parent,
    mixins,
    extends,
    provice/inject,

    // 其他
    name/delimeters/functional/model/inheritAttrs/comments
});
4.3 实例属性、方法、事件
new Vue({
    mounted() {
        // 属性
        console.log(this.$data, $this.props, $this.attrs);
        console.log(this.$slots, $scopedSlots);
        console.log(this.$el, this.$options, this.$listeners, this.$refs);
        console.log(this.$parent, this.$root, this.children);

        // 方法
        this.$watch(...);
        this.$set(...);
        this.$delete(...);

        // 事件
        this.$on();
        this.$once();
        this.$off();
        this.$emit();

        // 触发生命周期
        this.$mount();
        this.$forceUpdate();
        this.$nextTick();
        this.$destroy();
    }
});
4.4 全局 API
Vue.extend()Vue.component()Vue.use()Vue.mixin()Vue.set()Vue.delete()Vue.nextTick()
Q:
- nextTick 是什么?EventLoop 是什么?MicroTask 是什么?
- nextTick 的主要运用场景在哪?
4.5 其他
特殊特性:
:key:ref:slot:slot-scope:scope:is
内置的组件:
componenttransitiontransition-groupkeep-aliveslot
5 Vue-loader/Vue-CLI
5.1 Vue-loader
Vue-loader 是一个插件,它能让下面格式的文件转换为普通的 JS 模板的文件:
<template>
    <div> {{message}} </div>
</template>

<script>
 export default {
     data() {
         return {
             message: ""
         }
     }
 }
</script>

<style scoped>
</style>
使用 vue-loader 需要借助 babel 和 webpack 一起使用。
所幸,vue 官方给我们提供了一个脚手架,可以一步到位搭建所需要的环境。
5.2 Vue CLI
这是用来快速搭建 Vue 开发环境的脚手架,它集成了:
- vue-loader
- webpack
- babel
- 其他一些可选插件
使用前,必须要先安装 node:
然后,就可以使用 npm 命令安装了:
npm install -g @vue/cli
安装完后,打开命令行窗口,会有一个 vue 命令:
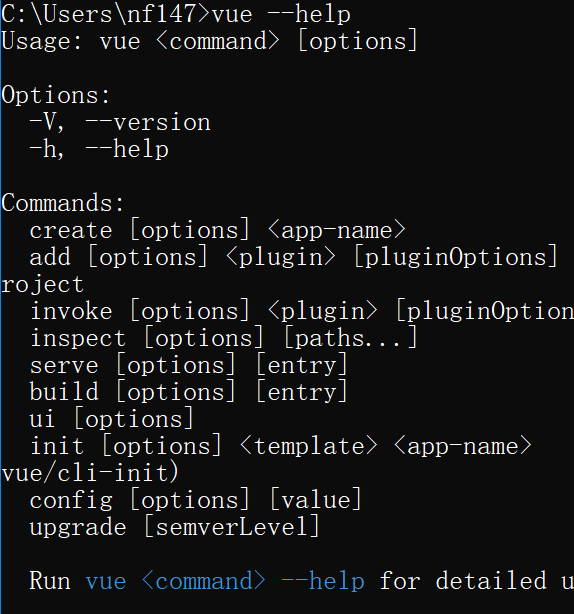
然后,就可以使用 vue 命令创建、管理项目了:
# 先切换到相应目录
e:
cd myhomework

# 然后创建项目
vue create vue-hello-world

# 创建完后,切换到项目目录
cd vue-hello-world

# 接下来,启动项目服务器
# 服务器启动后,就可以使用 http://localhost:8080 访问到首页了
npm run serve

# 然后就可以进行开发了
# - public 下面放一些全局静态文件
# - src 下面存在 main.js 跟相关 .vue 文件
# -- main.js 是入口 js 文件

# 开发完成后,就可以将工程打包、分发,运行在客户端了
# 执行完命令,打包的内容会在 dist 文件夹中
npm run build


## 另外,也可以使用图形化界面的形式进行(不推荐)
vue ui
6 ElementUI
http://element-cn.eleme.io/#/zh-CN
导入 ElementUI 到项目中:
# 首先,通过 vue-cli@3 脚手架创建项目
vue create hello-ele

# 其次,切换到目录
cd hello-ele

# 然后,就可以通过 eleme 的插件将 ElementUI 配置到项目中了
vue add element
然后,就可以使用了:
<template>
    <div id="app">
        <el-table :data="tableData" stripe border height="400px">
            <el-table-column fixed prop="date" label="日期" width="100"></el-table-column>
            <el-table-column prop="name" label="姓名" width="180"></el-table-column>
            <el-table-column prop="address" label="地址"></el-table-column>
        </el-table>
    </div>
</template>

<script>
 export default {
     data() {
         return {
             tableData: [{
                 date: '2016-05-02',
                 name: '王小虎',
                 address: '上海市普陀区金沙江路 1518 弄'
             }, {
                 date: '2016-05-04',
                 name: '王小虎',
                 address: '上海市普陀区金沙江路 1517 弄'
             }, {
                 date: '2016-05-01',
                 name: '王小虎',
                 address: '上海市普陀区金沙江路 1519 弄'
             }]
         }
     }
 }
</script>
更多,查看组件的帮助文档。
7 从 0 开始搭建 element 项目
7.1 第零步,安装 Nodejs/NPM
7.2 第一步,安装 vue-cli
打开 cmd 创建,在命令行下执行命令即可安装:
npm install -g @vue/cli
安装完后,会有一个 vue 命令可以被调用:
vue --version
如果没有,请从第零步重新开始
7.3 第二步,创建新的项目
打开 cmd 窗口,切换到相关工作目录:
d:
cd wodegongzuomulu
然后,在命令行下,使用 vue 命令创建项目:
vue create vue-xiangmu
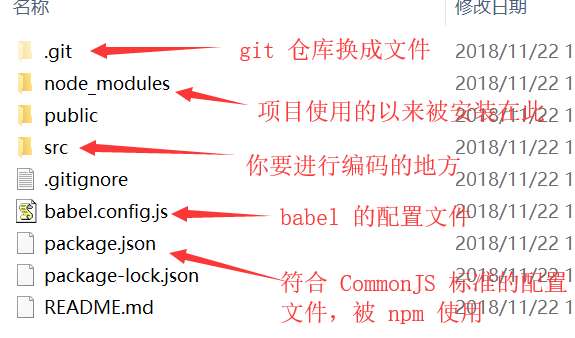
这时候项目就创建好了,创建好的项目目录如下:
7.4 第三步,增加 ElementUI 的支持
在刚才的命令行下,敲入命令:
vue add element
如果有提醒,分别选择:
- Full Import? Enter
- SCSS support? N
- ZH-CN
等待完成即可。
7.5 第四步,增加 router 支持
在上述的命令行下,敲入命令:
vue add router
如果有提醒,选择“回车”,“回车”….
等待完成即可!
7.6 第五步,开始编码。
7.7 另外的另外
vue add router 命令等同于:
- 首先执行
npm install vue-router --save 在 main.js 里添加:
// 引进
import Router from 'vue-router'
import Home from './components/Home'
import About from './components/About'

// 注册
Vue.use(Router)

// 定义
const router = new Router({
    base: process.env.BASE_URL,
    routes: [
        { path: '/', component: Home },
        { path: '/about, component: About }
    ]
})
vue add element 命令等同于:
- 首先,执行
npm install element-ui --save 在 main.js 里配置:
import Vue from 'vue';
import App from './App.vue';

// 引入 js + css
import ElementUI from 'element-ui';
import 'element-ui/lib/theme-chalk/index.css';

// 注册
Vue.use(ElementUI);

new Vue({
    el: '#app',
    render: h => h(App)
});
7.8 另外的另外的另外
src/main.js 是项目的 入口文件,也就是说,是打开应用要执行的:
第一个页面!
所以,经常要把一些全局性的配置放在里面。
7.9 另外的另外的另外的另外
先把环境搭好,学会使用。
然后:
- 了解流程
- 了解原理
- 实践实践再实践
- 深入深入再深入